Sunday, May 17, 2015

Chocolate Sugar Glittered Cake Mix Cookies


Yum yummy!
I saw some cookies at Pinterest, and they all had in common that the were made from cake mix. 
Neato, gotta try!
My birthday was last week (just like AAA CAS Card Challenges 1st Birthday). I didn't make the 
chocolate cake mix I'd picked up- so I'm ready to rock these. Too crazy easy.


Preheat your oven to 350
Cake mix in a medium to large bowl
Add 1/3 cup vegetable oil or butter
Add 2 beaten eggs
Blend with hand mixer until the batter pulls away from the bowl cleanly (yes, it's thick)

Hand shape little balls or use a small scoop (I use a very small ice cream scoop as per Martha Stewart)
roll or dip balls into a small bowl of sugar glitter (aka Wilton Clear Sugar Sprinkles)

Place 12 balls evenly on cookie sheet (I use parchment paper- it's the bomb)
Lightly squish down the cookies one by one with the bottom of a drinking glass
Pop into the oven. You'll get 24 cookies

Watch the first tray bake a little to get an idea how much time this batch takes to cook.
It's anywhere from 7 to 12 minutes. Each cake mix box varies ever so slightly.

Remove, cool and place on cooling trays
There you are, the clean up is quick and the cookies are great!

Cheers, Victoria

Thursday, December 4, 2014

Spindle Snowmen!


Here is an easy simple craft you can do with your kids.  They will look real cute on your porch or beside the tree.

Materials Needed:

Porch Spindles (I got mine at Lowes for less than $2 each).
Rectangle Wooden Plaque (Walmart Craft Dept)
Strong Glue of your Choice (I used E6000)
Glue gun and glue sticks
White, Black, Orange, Light Pink Acrylic Paint
Paint Brushes
Black small Pom Poms or Black Buttons
Red and Green Felt
Scissors
Medium sized Jingle Bells

I started this craft by glueing the rectangle of wood to the bottom of my spindle.  When I was purchasing my spindles, I was careful to find ones that were even on the bottom and stood straight.  Check them before purchasing, sometimes they are crooked and lean.  I glued mine at night and left them to cure overnight. 

Now you can either spray paint your spindles or hand paint them.  I found that hand painting them was easier for me.  It applied two coats of white acrylic paint. 

Once dry, you can put on their felt hats.  Cut off a thin strip (about 1/2-3/4 inch) from the long side of the felt (you will use this strip to tie on his hat.  Fold over a section on the shorter side of the felt to make the brim of his hat (about 2 inches) and wrap around the top of your spindle leaving enough at the top to tie it off and snip into strips for the pom pom effect.  I'm guessing I left about 4 inches from the top of the spindle and use your glue gun to secure the felt to the spindle.  Tie off the 4 inches remaining (overhanging the top of the spindle) with your strip you cut, then use scissors to cut strips (1/2-3/4 inch strips)  in the hat top to create the pom pom effect as you see in the photo above.

Once your hat is finished you can start on your snowman face.  Using the end of a paintbrush, dip in black paint and dot the eyes.  Also using the end of a paintbrush, dip into orange paint and make a orange dot under the eyes, use a small paintbrush to paint the orange out to a point off to one side to create a carrot like nose.  Next, again with the end of a paintbrush, make a dot mouth with the black paint.  I used various sizes of paintbrushes.  To create the rosy cheeks, either use a paint brush to paint pink circles or use a small round sponge brush.  Last, once the eyes have dried, take a smaller paint brush end and put white dots inside the black eye dots (I will add a close-up of the face soon).  Now your face is completed.


To make the scarf, cut a strip of the opposite color about an inch and a half from the long side of the felt.  Tie around the spindle and glue in place and glue on a jingle bell.

Lastly glue on your button or pom pom buttons.

You will be pleased with your creation I'm sure! 

Happy Holidays from Kids4Crafts!

Kemi Doran

Monday, November 24, 2014

Thanksgiving Turkey Magnet Clips


Since it's almost Thanksgiving I thought I would repost one of our Thanksgiving crafts.  These turkey clips are very easy to make and a fun craft to do with your child.  Click Here for full instructions and photos.

Saturday, September 8, 2012

Fingerprint Bugs, Most Popular Post


( reposted from 2009 and just for giggles this post has been opened 80,760 times wow)

Create your own little insect garden with your inked fingerprint and a fine point marker. Easy and fun to do with your kids.

Wednesday, August 22, 2012

Painted Jars, Easy Peasy for Kids!


Fall is finally coming! I've seen some lovely painted mason jars, many at Pinterest. You can paint the inside or outside. Spray paint looks great on the outside, I've painted the inside of mine with craft paint. I like how the gloss of the glass is still there when you paint on the inside. This was a "no cost" project for me. I already owned some nice autumn paint colors and had a few jars and flowers too.

While shopping at Michaels, I saw a orange milk tin for sale with raffia ribbon, a label and fall toned flowers...$29.99.  I took that idea, went home and applied it to painted jars. I first painted the jars (they need to dry overnight), then created/printed some vegetable labels. I used a length of silver wire to attach the labels. I just twisted, and twisted and twisted the ends into a knot. Regular raffia tied to a knot at the jars neck. And now a little trick....paint can scrape off the inside with those sharp artificial flowers ends. Use a tissue or fabric to cover the part of the flowers you can't see. I used a baby sock.
Instead of flowers you can use sticks, grass, toys, lolly pops etc. for a more personalized look.

This is a REALLY EASY PROJECT! I hope you make some time to try this one too.

Thursday, August 16, 2012

Love Monsters


I just started making some monster dolls for the grandkids, some will also be Christmas presents. This project may be too difficult for a child to do alone, but as your sewing helper you'll all have some great summer fun.


Here's some loose directions


Now that you have the front roughly cut out, you can sew on a face. Mine are made with soft foam, felt and buttons. I use embroidery thread to sew on and make the monster stitching. After I've created the face, I go onto making the back of the monster. This is the part that makes this important to my grandkids.......
I use old shirts from grandpop.

Using the back of the old shirt I trace the monster once more. My grandson says the monster side scares away bad monsters and the backside (grandpop shirt) is the real hugging side.

Ok, you have enough to sew up a monster now...or you could take it up a notch and make claws, hair tuffs and add a big heart.


Sew up your doll, stuff well with love. I hope you're inspired to create!


Monday, July 2, 2012

Firework Decorations


This is the second in my quickie decorations for my party. Some will be in decorative glasses as seen above. Some will be placed in plants. I'm also making a candy table topper. It's just like the photo, but you'll add little candy bars to bamboo skewers in the same way. I've seen those in grocery stores at the flower counter.

You'll need: (all can be found at a nearby dollar store)
Red, White and Blue basket shred
floral wire (or any light wire)
BBQ Skewers

Gather shred in palm of hand piece by piece (keep the grain in one direction) Maybe 20 shred strips.
Locate center and give a half twist to mark the middle.
Wrap wired around a few times, then spin wrap to the end of skewer. Fluff out.

Pictures and medallions can be added with good old scotch tape. Happy 4th of July!

4th of July Wreath

One of two Dollar Store 4th of July projects. I snapped both of these out quick for our party in two days. Thank goodness for the Dollar Stores!


You'll need: (I shop at "Greenbacks")
Wreath (plain, any kind)
Ribbon (your color choice)
2 or 3 cascading ribbons
pre-made OR homemade stars (Optional Glitter)
Hot glue & gun
Pipecleaner (makes the hanger for a nail)

Half hour to an hour to create. Happy 4th!

Wednesday, June 6, 2012

Summer Cup Cakes

A happy summer is just ahead. Enjoy these wonderful ideas for some family fun and good munching. Click the title of each photo to be directed to it's home page for more information and instructions.


Watermelon Cupcakes, idea from "Michaels"
Strawberry cake mix. Food colored icing and lots of chocolate chips:)


Berry Nice Catcakes
Your favorite cake mix, white icing, blueberries, strawberries and thin licorice. Yum!

All of today's cupcake photos and recipe sites have been chosen because each one is easy for kids to do with average supervision.  I'm going to make the Berry Nice Cats for our 4h of July Pool Party. Have some fun searching the web, sooooooo many fun cupcake projects for beginners and accomplished cooks.

I hope you have fun all the time,
Victoria Lavender

Thursday, February 2, 2012

So Cool Apple Cupcakes! from Pinterest


Aren't these great! Check out "Make and Takes" "Apple Shaped Cupcakes". Easy for kids. I bet we could make pumpkin cupcakes this way too!

I haven't been making crafts lately (we're house searching and home repairing these days). But I still like to look, so I'm going to start dropping cool craft ideas here at Kids 4 Crafts and at Victoria Lavender. I'll leave a quick note and leave you directions to the website where I found the new idea at. Today this idea comes from Pinterest.

I hope you enjoy the crafts I highlight. And for me it will be fun collecting ideas I can't wait to do after we settle into a new home.

Peace, Victoria

Saturday, October 22, 2011

A Halloween Candy Bag

Hello, it's time for a new challenge with The Crafty Pad. This week we are using a Halloween stamp from The Crafty Pad Design Store. A great place to get digi's! I've taken another craft avenue other than cards again this week. A Halloween Candy Bag for my grand daughter, Emma. She's going treat or treating as the vampire in "Adventure Time". I have no idea idea what that is:)


This bag is digital and handmade. The purple frame is borrowed from the internet. The stamp in the center is from The Crafty Pad and it is computer colored with pop tape layering. The words and skulls and eyeballs come from a K & Company Halloween pack. I cut a black and green circle then corner punched the black for a creepy lace curve and did a pinking cut for the edge of the green circle. I cut both in half to create the top and bottom accents on the purple frame. My ribbon at the top of the bag looks like a spider. Cool. There is also a little bow and spider at the bottom. In this bright sunlight it's hard to see just how much stickle glitter has been used. Orange, yellow, black , diamond and red. I love glitter.

So fun to make. Take any bag and dress it up for a Halloween goodies bag. This is a great project to make for your little kids too. Take a second to visit Victoria Lavender, my other crafting blog. Enjoy.

Thanks for the visit, please come by anytime.

Saturday, April 2, 2011

We haven't been around much lately


Hi, we're not out of business here. I know things are stagnant. We're a sister's team. Kemi and Vicki. Kemi moved back to Maryland (from Tucson) and our spark hasn't recouped yet on Kids 4 crafts. We may need to get some outside designers here on K4C to keep great kid crafts rolling. I'll start by checking out my cousin pool too.

Meanwhile I've become a card maker. Crafting does keep me outta trouble. If you'd like to see what I'm up to as a solo act then visit "Victoria Lavender".

My Mother's Day Card.

Wednesday, October 6, 2010

Pumpkins Rock!


Items needed:
Rocks (from your yard)
Base Coat Paint (white spray paint, light colored indoor wall paint, really thick craft paint…)
Orange Craft Paint (it you’re really slick-you might have orange spray paint lying around
from another project)
Medium Paint Brush
Black Sharpie Marker
Green Crepe Paper Roll (or yard twigs)
White Glue

I collected 8 small rocks from my yard. And yes, I carefully picked them for just the right look. I’m weird like that. I washed and let them air dry. Starting with the two smallest rocks I began to paint without an undercoat (silly me, I really should know better). I wanted this project to be quick…..well without a base coat they needed 5 or 6 full coats. That’s just nuts. I had white spray paint, so I used it, and boy it makes quite an improvement. I only needed 2 or 3 coats of orange then. Very easy project, but does take time to dry between coats. So I put them on a cookie tray with a large baggie under them to protect the tray, and placed it on my coffee table. This way I could paint during the TV breaks I took over the day. I left two white rocks for my little buddy to paint when came over the next morning.


Next morning Jake came over and loved the idea of doing some painting with Nana. This 3 year old did a great job and was concerned about covering the rock well. An hour later I took out the Black Sharpie and let him watch me draw on the 8 little pumpkin faces. He especially liked the smallest one because it had a different smile then the rest. Green crepe paper for the stems. I took a 3 inch piece of streamer and folded it in half. Holding with my left hand the folded edge toward my palm, I then twisted it tight from the open torn end down towards the folded end. Stop twisting a little shorter than getting all the way to the end. It creates a little base to glue down at. OR, break off some dried stems from around the yard and glue them on the rock pumpkins, or raffia, you can see where this is going. I just really wanted this project to be a cost free effort. And I love these little guys! I placed them around my rock garden and the pathway lights and few on the porch railing. I already know I need more.


Victoria Swanson

Thursday, July 1, 2010

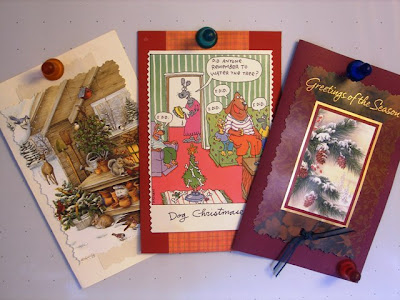
Recycled Christmas Cards


Everyone has Christmas cards from years past. Lets take a new look at them. Kids are great at transforming an older card into a new one. Get out your scissors and punches, glues, glitter, snow, ribbons and string. This family craft is one of the best for "no cost" crafting fun.

The following images are from the work I did last Christmas. I've done cards and tags and the last three are refrigerator magnets, these can make nice gifts too. Enjoy!


I really love the magnets, comic cards work great!

Take care, I'll try not to be so late with our next craft.

Peace, Victoria Swanson

Friday, April 10, 2009

My New Glitter Box


I love glitter! I have 3 buckets of glitter, Stickles, Embossing powder & glitter and glass beadies. To find the glitter, I’m always empting a bucket out on a table. (Table space? What’s that?)


While shopping at Michael’s, I noticed a nice little box filled with boxes with removable and sliding lids. Like those Tic Tac boxes. The price was $9.99. To me it seemed a little high. I bought it anyway after searching the store trying to find a less expensive substitute. The deal was set when I noticed for sale a 16 piece sample assortment of dark pigment glitters as a cellophane bag set. Ahh, my addiction! Glitter cost: $3.99. Storage box: $9.99. My husband would find this a bit suspicious.


Later that evening I filled the little boxes with the glitter assortment and a few more boxes from my current collection bucket. I think I secretly knew I was loading this box with dark pigments and that I’ll need another storage box as well for my transparent glitters. (The next week ...I bought one more.)

The lids are the greatest. They pull off to fill, or pour. But they also have a sliding hatch. I can control the flow of glitter (during use, of course) as never before. Ten of the boxes in the set are full sized and ten more are molded so there are two halves with a lid on each end.


Glitter is not a very tidy material, even with great boxes like these. Glitter is only as neat as you are. I will still have my original glitter containers in a bucket somewhere, as I will need to refill the boxes. But when I start a project now, I’ll need to just grab the one little box.


Search the internet or your favorite craft store for a nice compact way to keep your glitters portable and neat. I’ve seen boxes filled with capped jars, a cylinder set where the lids twist and stack. Many storage options are available for the crafty crafter.

Martha would say, “It’s a good thing”. I like, “Woo Hoo, Cool Beans!”.

Wednesday, April 8, 2009

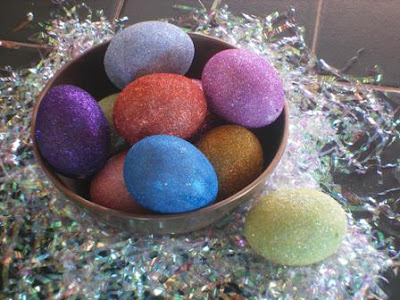
Easy Glitter Easter Egg Craft


(Easter Real Eggs Blown Glitter Craft)

I saw these at the Martha Stewart.com site. They are so pretty. I am a glitter nut and I couldn’t wait to start. Little did I know it would take me a week to prepare enough meals with eggs to get 12 shells. I suggest you make a big round of scrambled eggs or a quiche to get the shells faster than my politely asking everyone in the house to let me know when they are about to use an egg—so that I could blow it for the shell. Although, it was entertaining for the kids watching me blow my brains out blowing an egg.

Needed Items:
EGG SHELLS (cleaned & dried)
WHITE GLUE (or spray adhesive)
PAINT BRUSH
BAMBOO SKEWERS (every crafter needs these)
GLITTER (highly pigmented is best over Transparent)
GLITTER WORK AREA (a large box lid or bowl)
STYROFOAM HUNK (secure to a heavy base)


When your eggs are ready to work with, gently push a skewer into the larger egg hole. Carefully guide the tip through the top and smaller hole. Lightly make snug. (NOTE: One of my eggs had holes too big for the stick to be snug. Wrap a piece of cellophane tape on the stick just outside the egg holes.)


Pick your first glitter color and take the top off the container so it’s ready to use. Water down the glue a little bit and cover paint the whole egg. Don’t get too much on the stick (the glitter will pull off there later.) Start glittering the entire surface. I did the ends before the egg middle. Stick the skewer into your Styrofoam stand and let dry.


When the eggs are dry, use them to decorate around the house. Use a basket or beautiful glasswear. That’s the way they showed the eggs at Martha Stewart. Kids can easily do the glittering (and they love it). But after they dry, the eggs really aren’t a toy to play with and touch a lot. Still they are lovely to display and enjoy. And it’s a lot of fun to say “I made these myself!”.

Related Posts Plugin for WordPress, Blogger...