Tuesday, October 28, 2008

Black Cat Pencil Toppers

Photobucket
Items Used:
Black Pipe Cleaners
Pencils
White Glue
Black Glitter (I used Marcasite)
Detail Scissors
Paint Brush
Sharpie Marker
Optional Spray Adhesive


I recently saw these cute cats at the Better Homes and Gardens website. I re-created a template that turns out to be easier than theirs, but you can click and save the black cat at the bottom of this post for your use.

Cut out 2 cats for each pencil. After you make the cut out, take your marker to the white side (wrong side) and color around the edges and cut sides. This will fill in any slight differences in the two pieces. Take the marker and fill any white spots on the front of the cat too.


Take 1 cat body (working on the inside white area) and paint glue fully on the head and neck. Stop at the shoulders and run a fine bead of glue them, please check the picture guide. Take the second cat body and place and match together the white sides. You are trying to create a pocket in the main cat body for the tail and pencil.


Glitter time. If you intend to use spray adhesive, you’ll glue the eyes on after glittering. White glue folks may glue the eyes on first, use a paint brush and neatly surround the eyes with glue, and then do the overall black glitter. (check the bottom feet area of the cat-I almost glued them shut during glittering.)


Let dry. Play with you black pipe cleaner pussycat tail. Twist and spiral to your liking. Put glue on the end of the tail (about an half inch) and place into the cat body cavity. Follow with a lightly glued pencil. Let dry and enjoy!


 Thank you so much for the visit....now Click and Save this cat.

Victoria

Sunday, October 26, 2008

Pumpkins Rock!


Items needed:
Rocks (from your yard)
Base Coat Paint (white spray paint, light colored indoor wall paint, really thick craft paint…)
Orange Craft Paint (it you’re really slick-you might have orange spray paint lying around
from another project)
Medium Paint Brush
Black Sharpie Marker
Green Crepe Paper Roll (or yard twigs)
White Glue

I collected 8 small rocks from my yard. And yes, I carefully picked them for just the right look. I’m weird like that. I washed and let them air dry. Starting with the two smallest rocks I began to paint without an undercoat (silly me, I really should know better). I wanted this project to be quick…..well without a base coat they needed 5 or 6 full coats. That’s just nuts. I had white spray paint, so I used it, and boy it makes quite an improvement. I only needed 2 or 3 coats of orange then. Very easy project, but does take time to dry between coats. So I put them on a cookie tray with a large baggie under them to protect the tray, and placed it on my coffee table. This way I could paint during the TV breaks I took over the day. I left two white rocks for my little buddy to paint when came over the next morning.


Next morning Jake came over and loved the idea of doing some painting with Nana. This 3 year old did a great job and was concerned about covering the rock well. An hour later I took out the Black Sharpie and let him watch me draw on the 8 little pumpkin faces. He especially liked the smallest one because it had a different smile then the rest. Green crepe paper for the stems. I took a 3 inch piece of streamer and folded it in half. Holding with my left hand the folded edge toward my palm, I then twisted it tight from the open torn end down towards the folded end. Stop twisting a little shorter than getting all the way to the end. It creates a little base to glue down at. OR, break off some dried stems from around the yard and glue them on the rock pumpkins, or raffia, you can see where this is going. I just really wanted this project to be a cost free effort. And I love these little guys! I placed them around my rock garden and the pathway lights and few on the porch railing. I already know I need more.


Victoria Swanson

Thursday, October 23, 2008

Pumpkin Globe Votive


Items Needed:
A Glass Container (I chose a globe, you may choose almost anything glass)
White Glue
Paint Brush
Orange Tissue Paper (and a little yellow if its handy)
Black Crepe Paper Roll
Votive candle

(New word for kids: Decoupage)


While shopping the other day at my favorite dollar store "The Dollar Tree". I saw some new pieces in the glass isle, a 7 inch globe. Big enough for a fighting fish. And this new craft idea flew into my head. I’d just left the wrapping paper area and I remembered the Halloween crepe and tissue papers. And suddenly I could “see” jars and bowls and votive glasses and drinking glasses covered in torn tissue with cute black crepe Halloween faces on them.

To start, gather your materials. I took a half page of orange tissue page and ripped it up in squares (kinda) from 1 inch to most about 2 inches big. I grabbed a little bit of yellow into the mix too. The glass container is a great place to store the torn tissue. I used the glue straight from the bottle and painted some patches on the jar (randomly spread spots). These first patches are meant for the yellow squares (if you are using any yellow). At this point I took the first photo of the project. I continued to decoupage with orange on 1 side of the bowl. I am aiming for one layer depth with overlapping for the best effects of dark and light filtering through. It’s fine to be sloppy with the glue, it dries clear and is very forgiving. My side was dry when Jachob began to work on his side. He examined my previous work and just took off with painting and patching. A folded towel beneath his work area kept the glass from moving about. (Don’t take your eyes off a young kid for a moment, glass and fingers and a tile floor do not mix) We tried to be neat where it counts, and that would be the top and bottom. I kept the bottom clear of any glue so that it would sit well and be stable for the candle, and a candle would emphasize a raggy edge around the lip.


The face is cut from black streamer. I took a long length (who measures a streamer?) and made sure I ‘d folded for six layers. I want the face to be dark when lit up. Then I freehand cut the triangles. And now we have two layers for each eye and nose. With the mouth, I took a random length and sight measured where the smile would lie and how large it should be to complement the face. (I did this thinking on the eyes too, but just now realized it) My smile turns out to be about 5 inches, so I’ll need a foot of crepe. Fold in half and again. Where the fold is—is the largest part of the smile with the open end as the points. Just like cutting snowflakes, cut a nice half of a quarter moon from the whole folded piece. Open it up to the two layers the smile has become, and check if you like the shape. Crepe paper is cheap! If it’s what you like, then fold once and on the fold at bottom of the smile cut a half tooth out. Still folded, on the top cut a whole tooth about an inch in from the fold. Open and you have a cute double layer Pumpkin smile. Better yet!....make the face anyway you want, have fun.


Below is a picture showing how wet and sloppy the item looks while drying. Either almost dry or completely, a light coat of glue re-applied over the whole globe gives it nice finished appearance.


I lit my little craft on my front porch and I’m very pleased with my new Halloween votive. And best of all Jake was happy.


Victoria Swanson

Halloween Bat Clips


Materials Needed:
Black Foam Sheet
Sheet of paper
Googly Eyes
Black Pom Poms (not shown in photo)
Clothes Pin
Tacky Glue
Scissors


Fold sheet of paper in half, then in half again. Draw your wing and body pattern as shown below. I like to put the googly eyes on the paper when I draw the body for some reason, it's not required. Make sure your body is long enough to cover an entire clothes pin. Cut your foam the same size as your folded paper. Place your pattern over the foam sheet and trace with a pencil. (Notice the thawing Brisket in the sink? Mmmm).


Now it's time to cut out your pattern and glue it to your clothes pin. Using the tacky glue, glue on your wings first as shown. The tacky glue doesn't glue instantly so you have to hold it few a few seconds, it will slide around while you work with it, but once you are finished working with your bat and leave it alone for about 10 minutes it will be nice and glued. Glue the body over the wings as shown and hold again briefly.


Now you can wait for the glue to firm up a little or go on working, it will slide around a bit, you could use a hot glue gun I suppose. Glue on the googly eyes and pom pom nose, and whala...you are finished.


Now depending on the direction you glue your clothes pin your bat will either hang upright or upsidedown. You could also glue on a magnet strip to the back of the clothes pin and use him for a refrigerator clip. I hung them from my kitchen curtain. Look how cute they are!


My daughter Holly decided to go a little further on one of her bats, here is her "bling" bat clip.


Kemi and Holly Doran

Wednesday, October 22, 2008

Black, White, and Gold Pumpkins


Materials Needed:
Black, White and Gold Spray Paint ($$)
300 Pumpkins (Why not, the paint was costly)
Light Wire
Sharpie (for it’s tube shape)
Glitters
Glue
Craft Paint
Small Tip Brush


Wash and dry all of your pumpkins. Make sure they are really dry. Now we can create those cute little wire curlee cues. Take a loosely measured yard of wire and bend in half. I cut a tiny notch on a ridge of the stem to catch the loop end of the wire. This allowed me to wrap the wire tightly around the pumpkin stem about 3 or 4 times. Remember the wire is doubled up, so it looks like you wrapped it more. Separate the two pieces and take out the sharpie. Get comfortable, you might want to hold the pumpkin in your lap. Hold one wire at the base where it becomes free from the stem wrapping. Wrap the wire like a spring around the sharpie. Slide out the sharpie and do the same to the other wire. Stretch them a bit to get the look you like. They’ll be painted along with its pumpkin.


Set up a paint station outside. For me it was the ground. I used an old tree stand and ugly wide mouth vase to hold the pumpkins while spraying and drying. Start spraying the bottoms first, let dry well before giving them the flip. Black will cover nicely and white goes on great! But as for the gold pumpkins, you’ll need to base coat them first with white. Gold paint is too expensive to do several coats. You should find that you’ll only need one gold coat if you made a base coat.


Spray paints are quite an investment for just hobbying around. But using them smartly will enable you to work with many more projects down the road. While your spending - consider a clear coat spray as well. These four paints will complement your craft collection immensely.


After the pumpkins dry...they are simply beautiful! You could stop working on them now and decorate your porch or you may choose to glitter some too. So far this craft could be done with supervised school-aged kids, but now we come to the part that the littlest ones can enjoy too. Glittering! This cute and bright crazy color glitter pumpkin can be done by anyone. Or you could write and draw. I found this to be easier when I first painted my design in craft paint. Choose craft paint color that will work as a backing color to the glitter (this will help the glitter look brighter). And now you’ve got some beautiful pumpkins to display and delight your neighborhood.


Version 2: (You could hand paint them :)
Pumpkins
Craft Paint


Victoria Swanson

Candy Corn Sun Catchers


Items Needed for Tissue Version:
Foam Sheet, sticky back kind in any Halloween color
Tissue Paper, Orange, Yellow & White
Page Protector Plastic, or similar
White Glue
Scissors
Hole Punch
Ribbon or String
Scrap Paper, 2 pcs
Paint brush or chopstick
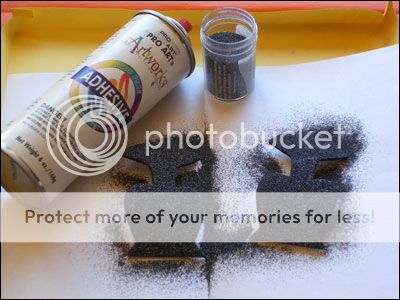
Version with Glitter:
All the above, trade out tissue with 3 colors of glitter


Take a piece of paper and fold in half. Freehand cut on the fold, a shape of half a piece of candy corn. Make any size you like as long as it will fit your foam sheet. Take your second piece of paper and trace the design you just cut out. Now the candy corn cutout will guide you through the first cut on your foam. Cut the foam in a rectangle about 1 inch or more larger than the cutout guide. Fold the foam in half longwise (protective paper liner on the inside) place the folded candy corn guide over the fold and cut out the candy corn window for the foam. Make the foam flat again and you’ll see a candy corn shaped window. Put the foam aside. Back to the traced image on scrap paper, cut a page protector to about the same size as your foam, tape the plastic sheet over the traced candy corn. Tape the points and sides, wet glue will make this curl a bit. Now you’re ready to cut out your tissue paper. I wrinkled the paper and re-flattened it. You don’t have to destroy the sheet of tissue paper. I never unfolded it to begin with. I folded the prefolded sheet longwise till it was about 3 inches wide. Wrinkled the edge, smoothed it out and trimmed off 3 half inch strips, then cut those into nice little squares. Do with all three colors. What I found while making this project is that its more work than it looks like. I’m a crafter and I just rolled with it, the sun catcher is easy, but for little ones you will have to do the prep work in advance. Most 4th graders and up can do all with some light guidance.


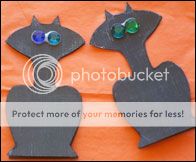
Assembly time! Fingers and glue. Squirt glue on the plastic sheet on the bottom third of the candy corn design (the sheet you prepared earlier) and spread with your fingers. Place the orange squares in rows across. Slightly overlap the traced design. The back end of a paint brush helps to hold down the squares and push a little for their placement. Do the same for the yellow and white squares. Let dry, and that takes as long as it takes according to your climate. After the craft dries take the foam window sheet and strip off the backing. Center the window over the dried tissue and stick down the whole thing. You, or an older child will now freehand cut around the foam window, start at the bottom and trim to a quarter inch. (You are creating a border) As you cut to the top of the candy corn extend the trimming to be an inch higher so you can have an area to punch through with a hole puncher. Its all cut out now, press the edges well. If the traced sheet is still sticking to the candy corn, pull off gently.


String your ribbon and hang in a window or let many blow in a tree.


To make the glitter sun catcher, do all the prep steps to create the foam window sheet and the traced sheet covered with a page protector and well taped. Finger paint glue over the entire design. Starting at the bottom of the design shake your darkest glitter over the bottom third, the medium color in the middle third and the lightest color on top which makes that cute candy corn look. Let dry. Place the foam window over the dried glitter and continue the last steps from above.


Making this a second time, I realized this is a quick project once you get the assembly worked out in your head. Later you can make Christmas tree balls, Easter eggs or anything that comes to you.

Victoria Swanson
Related Posts Plugin for WordPress, Blogger...