Showing posts with label Christmas. Show all posts
Showing posts with label Christmas. Show all posts
Thursday, December 4, 2014
Spindle Snowmen!
Here is an easy simple craft you can do with your kids. They will look real cute on your porch or beside the tree.
Materials Needed:
Porch Spindles (I got mine at Lowes for less than $2 each).
Rectangle Wooden Plaque (Walmart Craft Dept)
Strong Glue of your Choice (I used E6000)
Glue gun and glue sticks
White, Black, Orange, Light Pink Acrylic Paint
Paint Brushes
Black small Pom Poms or Black Buttons
Red and Green Felt
Scissors
Medium sized Jingle Bells
I started this craft by glueing the rectangle of wood to the bottom of my spindle. When I was purchasing my spindles, I was careful to find ones that were even on the bottom and stood straight. Check them before purchasing, sometimes they are crooked and lean. I glued mine at night and left them to cure overnight.
Now you can either spray paint your spindles or hand paint them. I found that hand painting them was easier for me. It applied two coats of white acrylic paint.
Once dry, you can put on their felt hats. Cut off a thin strip (about 1/2-3/4 inch) from the long side of the felt (you will use this strip to tie on his hat. Fold over a section on the shorter side of the felt to make the brim of his hat (about 2 inches) and wrap around the top of your spindle leaving enough at the top to tie it off and snip into strips for the pom pom effect. I'm guessing I left about 4 inches from the top of the spindle and use your glue gun to secure the felt to the spindle. Tie off the 4 inches remaining (overhanging the top of the spindle) with your strip you cut, then use scissors to cut strips (1/2-3/4 inch strips) in the hat top to create the pom pom effect as you see in the photo above.
Once your hat is finished you can start on your snowman face. Using the end of a paintbrush, dip in black paint and dot the eyes. Also using the end of a paintbrush, dip into orange paint and make a orange dot under the eyes, use a small paintbrush to paint the orange out to a point off to one side to create a carrot like nose. Next, again with the end of a paintbrush, make a dot mouth with the black paint. I used various sizes of paintbrushes. To create the rosy cheeks, either use a paint brush to paint pink circles or use a small round sponge brush. Last, once the eyes have dried, take a smaller paint brush end and put white dots inside the black eye dots (I will add a close-up of the face soon). Now your face is completed.
To make the scarf, cut a strip of the opposite color about an inch and a half from the long side of the felt. Tie around the spindle and glue in place and glue on a jingle bell.
Lastly glue on your button or pom pom buttons.
You will be pleased with your creation I'm sure!
Happy Holidays from Kids4Crafts!
Kemi Doran
Thursday, July 1, 2010
Recycled Christmas Cards

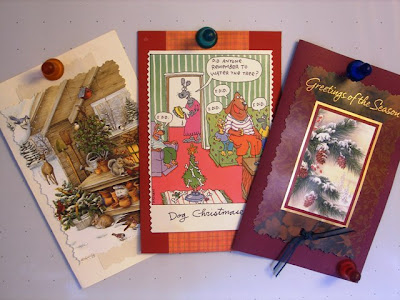
Everyone has Christmas cards from years past. Lets take a new look at them. Kids are great at transforming an older card into a new one. Get out your scissors and punches, glues, glitter, snow, ribbons and string. This family craft is one of the best for "no cost" crafting fun.
The following images are from the work I did last Christmas. I've done cards and tags and the last three are refrigerator magnets, these can make nice gifts too. Enjoy!


I really love the magnets, comic cards work great!
Take care, I'll try not to be so late with our next craft.
Peace, Victoria Swanson
Tuesday, December 23, 2008
Breadstick Wreath

You'll need:
Any Brand Breadstick Dough
Confectioners Sugar
Red Cinnamon Dots or Red Food Coloring
Toothpick
Ribbon for a Bow

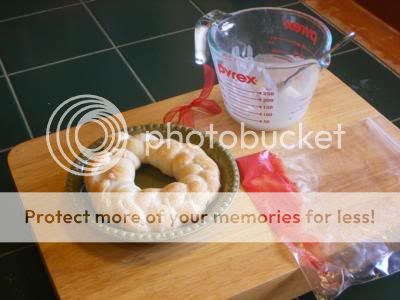
Open your dough. Take three pieces apart and lay out flat, pull and stretch the dough till about 12 or 14 inches long.

Braid them together. I pushed my thumb into the starting pieces to secure a bit to the cookie board. Finish the braid.

Curl into a wreath shape. Shape the ends together neatly.

Cook according to package directions.

After it has cooled, drizzle confection sugar glaze over the wreath.

If you have cinnamon dots, place three together like holly berries. I didn't have any, so I colored a little bit of the confection glaze with red bark and dabbed out my little berries. I made a red ribbon bow and with a toothpick I stuck the bow to the wreath where the ends had met. This are still dinner rolls. You've barely used much glaze and they haven't magically become sweet either, just pretty.

A few of these in a basket on a set table would look very festive, and your little cook will feel a great deal of satisfaction and accomplishment.
Victoria Swanson
Wednesday, December 17, 2008
Reindeer Magnet Clips

I thought up these cute little reindeer since my turkey magnet clips were so popular, so here are the Reindeer Magnet Clips.

Materials Needed:
Foam sheets in Brown or Tan Shades or Black
Clothespin
Sheet of Paper and a Pencil or Pen
Googly Eyes
Small Red Pom Pom
Small Jingle Bell
Scissors
Glue Gun or Tacky Glue
Magnet Strips

Using your sheet of paper and pen or pencil draw your pattern, the face is a large circle with a smaller circle for the mouth area of your reindeer, it is approximately 2-1/2 inches tall and 2 inches wide. You can use a compass if you like or a jar lid it it's small enough or maybe you have a good eye. For the antler pattern I drew what looked like a cactus, probably because I used green paper. It is approximately 2-1/2 inches long and 1-1/2 inches wide. Cut out your patterns and trace with a pen onto your foam sheets as you see below.

Using your scissors, cut out your foam pieces. I also cut out small football shapes of the same color as your reindeer face for ears. You will see them in the photo below.

Glue your reindeer face onto your clothespin leaving about 1/2 inch at the bottom to glue on a jingle bell. I found that googly eyes look best when placed right next to each other. My first attempt at these reindeer clips I spaced them apart and he looked like an angry reindeer, LOL. So glue your googly eyes next to each other and glue on your pom pom nose. Glue your ears behind the top of the reindeer face as shown above.

Next glue your reindeer antlers behind and between your clothespin and the ears you glued on already. You may need to trim them at the bottom some if you like to make them easier to glue and not overlap the clothespin. You want them glued to the back of the foam face, not the clothespin.
All you need to add now is a jingle bell, glue it just below the face onto the clothespin. If you have self-sticking magnet strips just cut off about an inch or so and stick to the back of your clothespin or glue on if it's not self-stick. These were fun to make and they look cute on my refrigerator.

Kemi Doran
Saturday, December 13, 2008
Dollar Store Christmas Wreath

All the materials used to create this lovely Christmas wreath were purchased at the Dollar Tree, you can find most of this at any local .99 cent store or dollar store. There is no end to the possibilities you can create here by purchasing different material combinations. I purchased a wreath base that needed alot of molding and bending but looks pretty decent, small red poinsettias bunch, white snow frosted holly leaves and berries, red snow frosted holly leaves and berries, gold wired garland with red and gold glass ball clusters and gold berries. I already had in my crafts stash the large jingle bells, left-over from the jingle bell doorknob hangers, and the wire edged christmas ribbon from a project last year. Total cost of this wreath would be approximately $5.00.

I started my wreath with the pointsettias. Clip the flowers off the stems individually or in clusters, I used clusters of three. Using a glue gun, glue them as you wish onto your wreath base or as I have shown below.

Next I added some of the wired gold garland and the gold berries stemming out from my poinsettias, but you can do what you want, it's your creation. You may be working with completely different materials, so just go crazy.

I added the white snow frosted berries and some of the red glittered holly leaves and the red and gold glass ball clusters.

Last I added the red snow frosted berries and the white snow frosted holly leaves. You could say you are finished at this point, but we can do a little better by adding a bow and a jingle bell.

I have this wreath hanging on my fireplace right now among the stockings and garland, it adds a great touch and was extremely easy to make! Hope you have a great Holiday!

Kemi Doran
Thursday, November 27, 2008
Jingle Bell Doorknob Hangers

This was an extremely easy craft that just hit me as I was walking around Wal-Mart and caused me to immediately leave and head to the Dollar Tree. I thought of how I could make jingle bell doorknob hangers with bangle bracelets, curling ribbon and large jingle bells. Each jingle bell hanger cost me approximately $1 and I made them myself, I like that.

Materials Used:
Sparkly Bangle Bracelets (3 in a pack for $1)
Sparkly Curling Ribbon (3 colors for $1)
Large Jingle Bells (Pack of 9 for $1)
Scissors


Start by pulling a length of ribbon off the roll and tie the end to a large jingle bell leaving about 6 inches for curling. Use your scissors for curling your ribbon by pulling the ribbon between your thumb and the blade of the scissors. Hold your bell by the ribbon and tie onto the bangle braclet allowing it to hang approximately 6 inches from the braclet bottom, cut off about a foot length for curling. Do this to 3 bells, each one hanging 2 inches below the other until you have what you see in the photo below.

Curl each length of cut off ribbon and you are finished. I did add an additional 2 foot of ribbon tied and curled in the center to make the curls look fuller. You can add as many lengths of ribbon and curl as you want.

This craft takes about 10-15 minutes from start to finish and will look quite nice hanging from your doorkknob this Christmas season. Happy Holidays!
Kemi Doran
Tuesday, November 18, 2008
Licorice Wreaths

I was watching Modern Marvels, an episode on candy making, and watched how they make Red Vines Licorice. My mind was on our website and suddenly I "saw" a craft made with the licorice. This is so easy a three year old could do most of it. If they can tie a bow, they could finish the project.
Red Vines Licorice
Ribbon, red looks very good!
Pipe Cleaners to match the ribbon
Thin matching ribbon or thread
1 Bell
Optional: Spray Glitter

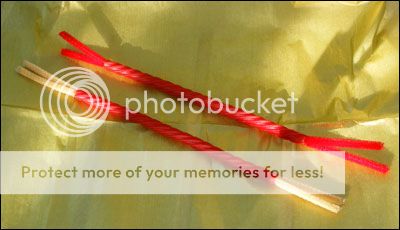
Take a piece of licorice and eat it. Now for the next one, cut off the tips and round out the opening. Match up 2 pipe cleaners and push through the opening all the way through the other side. End up the ends again. Twist then all together into a fat 2 inch stick, bend it over to form the eyelet area for a Christmas hook.

30 inches of ribbon (doubled makes 15") makes a nice bow. Tie on the bell with thread or thin matching ribbon with the little knot on the backside of your wreath. Optionally if you have some spray glitter, give it the once over.

You can't eat these, and I wouldn't let the kids eat the ones without glitter either. They'll dry out and crack after the season so feel free to toss these after the tree comers down. But oh so cute! Little ones will enjoy this project and feel proud of their work, they can make a gift of it to grandma too.
Victoria Swanson
Saturday, November 15, 2008
Reindeer Pencil Toppers

These little reindeer are darling, even if I do say myself. Last month I made a few pencil toppers and the spiral ones gave me the idea to create these odd fellows. Really fun at school and make nice gifts from kid to kid. I borrowed my niece Holly for these step by step photos. Holly is 10 and did a wonderful job as my assistant. These are the now famous “Reindeer Pencil Toppers” that we will be doing in our demonstration on Dec. 13th at Bookman's on Speedway in Tucson. Children of all ages are welcome at the show and please try these at home and send us a note and photo.
We love our little reindeer so much that we are making them available as craft sets (See the left column for details).
Items Used:
2 Pipe Cleaners
1 New Pencil
Spare Pencil
5 Shiny Pony Beads
1 Red Pony Bead
2 Googly Eyes
Tacky Glue or Heavy Duty Glue Dots or Hot Glue
(depending on child’s age group)

Directions for Righties: Pick up 2 pipe cleaners. Even up their ends (see photo above) and hold in your right hand. Using your left thumb press pipe cleaners against a pencil about 2 inches below the eraser at the ends and start wrapping tightly about 3 times around the top of the pencil with your right hand. Try to keep the pipe cleaners flat as you wrap upward toward the eraser, this will form your reindeer face area (see photos below).


Your thumb is very important to spiraling the pipe cleaners around pencils so hold it firmly while you wrap. Twist the 2 pipe cleaners together where you stop just behind the eraser, and separate them a little (like giant rabbit ears).


Take the spare pencil and repeat the spiral wrapping on each pipe cleaner antler. Holly took a short cut here by taking the spare pencil and placing it midway atop the reindeer pencil on the eraser end and wrapped both sides of the spare pencil. It looked like a big letter “T” her way. And I've found it to work great for me too. Gently slide the spare pencil out of the wrap you just created. Now your have 2 antlers and a plain face.

Through trial and error we have found that you should glue the face on last and slide the 5 colored beads down the antlers now, 3 on one side and 2 on the other. Glue on googly eyes and little red bead nose (I glued the nose vertically and the hole is seen from the side). On a few pencils at my house I tied a little bell on a thin red ribbon around the bottom of the reindeer’s neck, though this might not be a good idea for pencils to be used in school.

You have a cute reindeer pencil! Make some for your school chums and teachers as gifts.

Victoria Swanson
Subscribe to:
Posts (Atom)


