Showing posts with label Spring. Show all posts

Wednesday, April 8, 2009

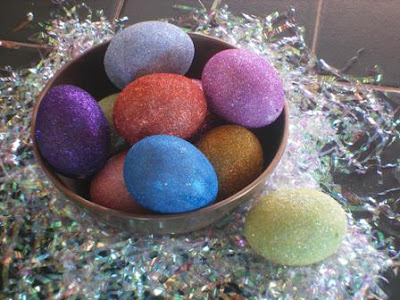
Easy Glitter Easter Egg Craft


(Easter Real Eggs Blown Glitter Craft)

I saw these at the Martha Stewart.com site. They are so pretty. I am a glitter nut and I couldn’t wait to start. Little did I know it would take me a week to prepare enough meals with eggs to get 12 shells. I suggest you make a big round of scrambled eggs or a quiche to get the shells faster than my politely asking everyone in the house to let me know when they are about to use an egg—so that I could blow it for the shell. Although, it was entertaining for the kids watching me blow my brains out blowing an egg.

Needed Items:
EGG SHELLS (cleaned & dried)
WHITE GLUE (or spray adhesive)
PAINT BRUSH
BAMBOO SKEWERS (every crafter needs these)
GLITTER (highly pigmented is best over Transparent)
GLITTER WORK AREA (a large box lid or bowl)
STYROFOAM HUNK (secure to a heavy base)


When your eggs are ready to work with, gently push a skewer into the larger egg hole. Carefully guide the tip through the top and smaller hole. Lightly make snug. (NOTE: One of my eggs had holes too big for the stick to be snug. Wrap a piece of cellophane tape on the stick just outside the egg holes.)


Pick your first glitter color and take the top off the container so it’s ready to use. Water down the glue a little bit and cover paint the whole egg. Don’t get too much on the stick (the glitter will pull off there later.) Start glittering the entire surface. I did the ends before the egg middle. Stick the skewer into your Styrofoam stand and let dry.


When the eggs are dry, use them to decorate around the house. Use a basket or beautiful glasswear. That’s the way they showed the eggs at Martha Stewart. Kids can easily do the glittering (and they love it). But after they dry, the eggs really aren’t a toy to play with and touch a lot. Still they are lovely to display and enjoy. And it’s a lot of fun to say “I made these myself!”.
Tuesday, April 7, 2009

Sugar Glitter Plastic Eggs


While I was making the Glittered Eggs I realized that the transparent glitters didn’t look as nice on white eggs as I’d hoped. Sitting at the same table where I was crafting on real egg shells, I noticed my little plastic eggs that we use for the Easter hunts. And I thought again about transparent glitter. “Hey these are already colored, I bet they’d look great covered in snow or SUGAR GLITTER!

You’ll Need:
PLASTIC EGGS (this was crafted on pastel colored eggs)
WHITE GLUE (or spray adhesive)
BAMBOO SKEWERS
HOLE MAKER: create holes top and bottom of egg. Use a sharp knife point, ice pick, little drill or Dremel.
CLEAR GLITTER (also called sugar or snow)
STYROFOAM STAND
FILE (nail or Dremel)


Check your plastic eggs for their hole at the top and bottom. Some do, some don’t and mine had holes in other places than desired. Since mine where so difficult, I used my Dremel drill top and bottom to have holes where I wanted them. I also filed off the little hinge on the side of the egg. Put them on the skewer as done with the “Glittered Eggs”. Paint or spray on the glue and cover with glitter. Stick the skewer in to the Styrofoam stand to dry.


I was going to string ribbon through the holes of the plastic eggs and use as a garland. My daughter, Rachel, gave me this great big table basket and I relocated the ceramic rabbit from years ago. I think it all comes together nicely. Happy Easter!

Tuesday, March 24, 2009

Foamies Glittered Butterfly Wand


During one of my many visits to The Dollar Tree, I saw packages of Butterfly and Star Foamie Wands. Many of the stores are still carrying these on their shelves.


I used:
FOAMIE WAND PACKAGE
WHITE GLUE
LOT’S OF GLITTER
RIBBON

WIRE (6 to 8 inches and something pointy like a ice pick)
PENCIL (use a light stroke when drawing on the foamie)
SMALL TIP PAINTBRUSH (for glue)
MEDIUM TIP PAINTBRUSH (stays dry to push away glitter)

Glitter Station:

1 box lid (larger than 8.5 x 11’s)
2 sheets of paper 8.5 x 11

Trace your foamie wand on a piece of scrap paper. Experiment with drawing some pattern’s till you like the one you will re-draw on the foamie with the light touch of pencil.


After your pattern is on the foamie, create a glitter work station. I use a 12 x 10 box lid. Take and 8.5 x 11 piece of paper and fold up three sides about an inch. This is your left over glitter pan. The glitter that didn’t make back in to the container after use is to be collected for your homemade mixed glitter jar. On top of the glitter pan paper, place the other 8.5 x 11 sheet folded in half. This piece works as your funnel to catch and pour back glitter to it’s container.


To glitter the wand, start from the middle and work your way out to the edges as you change colors. Dab some little dots of glue on the pattern area you’re working on. Use a small paintbrush to “color” in. Carefully cover with a light layer of one glitter color. Repeat for each color used. I still had a little trouble keeping colors where I wanted them. It’s easier to fix color run over with patience. Wait until the wand is completely dry and paint on new glue and glitter to repair areas. Always try to flip the wand over quickly and neatly with a little tapping to shake loose the extra glitter. And letting one side dry before starting the other is advised. Bend the wire in half and bend to taste for the antennae. Poke a hole in the top of the foamie butterfly head with something like a ice pick. Insert the wire with a touch of glue into that hole.


Now, if you still have some time before you give this wand to you princess you might want to think about sealing the glitter so it doesn’t end up all over your house. Easy to do with more white glue. When the item is totally dry, apply a coat of glue evenly over the whole surface of the wand top. Again let dry. But now it will be much more durable and kid safe.

Fairy Princess Crown


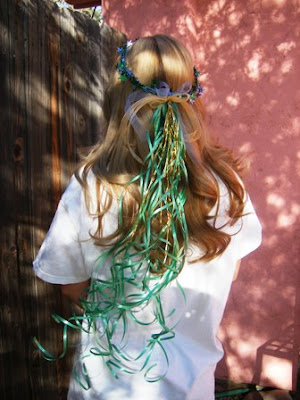
Every kid needs a crown! I’ve seen entire craft booths dedicated to fairy princess crowns. They’ll sell for anywhere between $3.00 to $8.00. Let’s make our own. Dig into your left over Christmas decoration box for our main supply needed, Shiny Star Wire Coils. If you don’t have any, go to a Dollar Tree Store. They ALWAYS have some sort of wire garland that will work for you.

You’ll need:

WIRE GARLAND COIL
LOT’S O RIBBON (paper and fabric)
TOUGH SCISSORS

Size a loop around your little one’s head and use it to measure 2 or 3 more loops. Cut and tie off by tightly winding the end piece’s around all 3 or 4 loops. That should keep it tight and strong enough to stay together. For the long flowing ribbon in the veil, I cut 12 four feet lengths of curling ribbon I tied them on using half hitch knots with 2 strands per knot. I also used some scrap ribbon and some left over long gold icicles from Christmas. Please alter to you little princess’s crafty desire.

Glittered Butterfly Wand


Glitter Butterfly Wand

This should be a no cost project. We’ve put together a PDF for you to print with a lovely yellow butterfly. You’ll need a few things:

PDF PRINTOUT Click here to download printout
CARDSTOCK
STRAW (Strong, like a 12” Convenience Store Soda Straw)
WHITE GLUE
DOUBLE SIDED TAPE (But it’s not necessary)
SCISSORS
GLITTERS
PIPE CLEANER
RIBBON

Carefully cut out and trim the two butterfly images.


Mount them back to back on the end of your heavy duty straw. I choose to use double sided tape to secure the butterflies to the straw. I painted white glue between the wings. Let dry. Check to make sure the wings don’t come apart while they are drying.


Glitter your Butterfly any way you want. It may help to let the front dry before starting the back.


Bend the pipe cleaner in half. Twist each end to make the antennae. With a drop of glue, stick the antenna into the top of the soda straw. Tie a pretty ribbon just under the butterfly. In most of the photos you may have notice a fancier straw. I had glued on a thread and glitter, but it crumbled under my touch. It wouldn't have worked for a child, so I removed it.

And there, we have a cute and easy enough wand for your little princess fairy.

Monday, March 9, 2009

Fingerprint Bugs


Create your own little insect garden with your inked fingerprint and a fine point marker. Easy and fun to do with your kids. You'll need a few things to get started.

Paper (we used vellum bristol to make bookmarks)
Baby Wipes (or an old wet towel, maybe some windex)
Colored Ink Pads (or markers and waterpaint)
Black Fine Point Marker (or black pen)
Imagination


Put your finger into the ink pad (or color source) and press out a nice print. Oh heck, do a lot of nice prints in many colors. Remember to wipe your finger before changing colors. The more you wipe your finger tips the better chance you have at getting the ink off before you become "dyed" for two days. Go back with the black marker and draw faces, bumps, legs and arms - don't forget the "feelers". Make them up as you go. Some will look great, some might look goofy. After you get the hang of "seeing" a bug in a fingerprint, move on to creating a garden for them to live in.

Here's a few ideas.


Related Posts Plugin for WordPress, Blogger...